
Our website uses cookies to enhance your browsing experience.

This article continues the series of publications on usage of PVS-Studio in cloud systems. This time we'll look at the way the analyzer works along with GitLab CI, which is a product made by GitLab Inc. Static analyzer integration in a CI system allows detecting bugs right after the project build and is a highly effective way to reduce the cost of finding bugs.
To get current information about it follow the updated documentation page "Using with GitLab CI/CD".

A list of our other articles on integrating into cloud CI systems:
GitLab is an online service designed to manage repositories. You can use it directly in a browser on the official website by registering your account, or install and deploy it on your own server.
PVS-Studio is a tool designed to detect errors and potential vulnerabilities in the source code of programs, written in C, C++, C# and Java. Works in 64-bit systems on Windows, Linux and macOS and can analyze code for 32-bit, 64-bit and embedded ARM platforms. If it's the first time you're using the analyzer to check your projects, we recommend that you read the article on how to quickly check out the most interesting PVS-Studio warnings and evaluate the tool's capabilities.
The OBS project will be used to demonstrate abilities of the static analyzer in the cloud. Open Broadcaster Software is a free and open set of programs for video recording and streaming. OBS provides real-time device and source interception, scene composition, decoding, recording and broadcasting. Data is transferred mainly through the Real Time Messaging Protocol, and can be sent to any source supporting RTMP - the program has ready-made pre-installations for live broadcasting on the most popular streaming platforms.
To start working with GitLab, go the website and click Register:
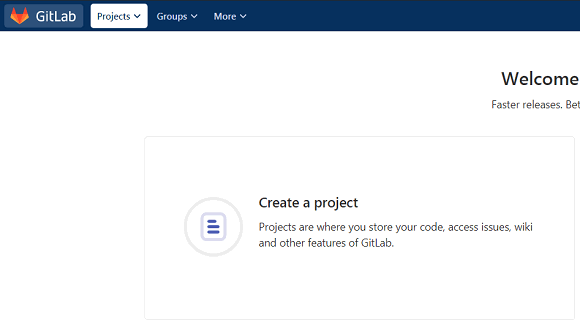
You can register by linking accounts of other services such as GitHub, Twitter, Google, BitBucket, Saleforce or simply by filling out the open form. After authorization, GitLab invites us to create a project:
A list of available platforms to import files:

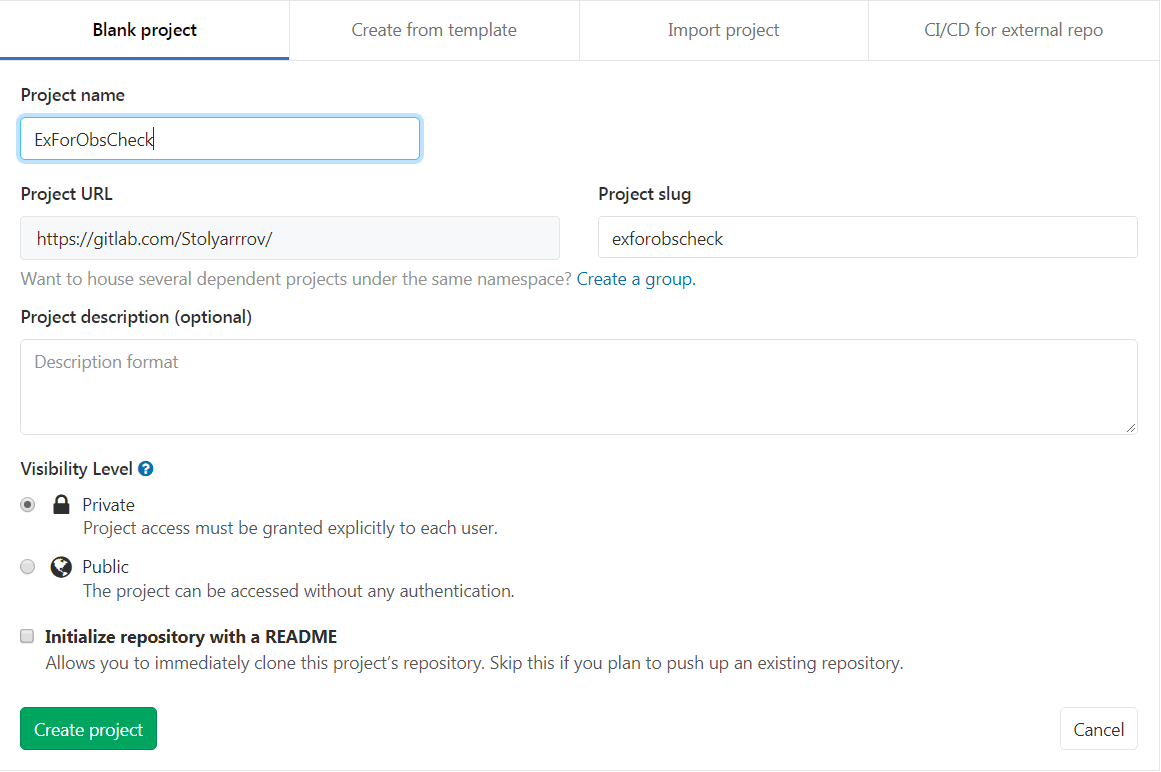
Let's create an empty project for clarity:
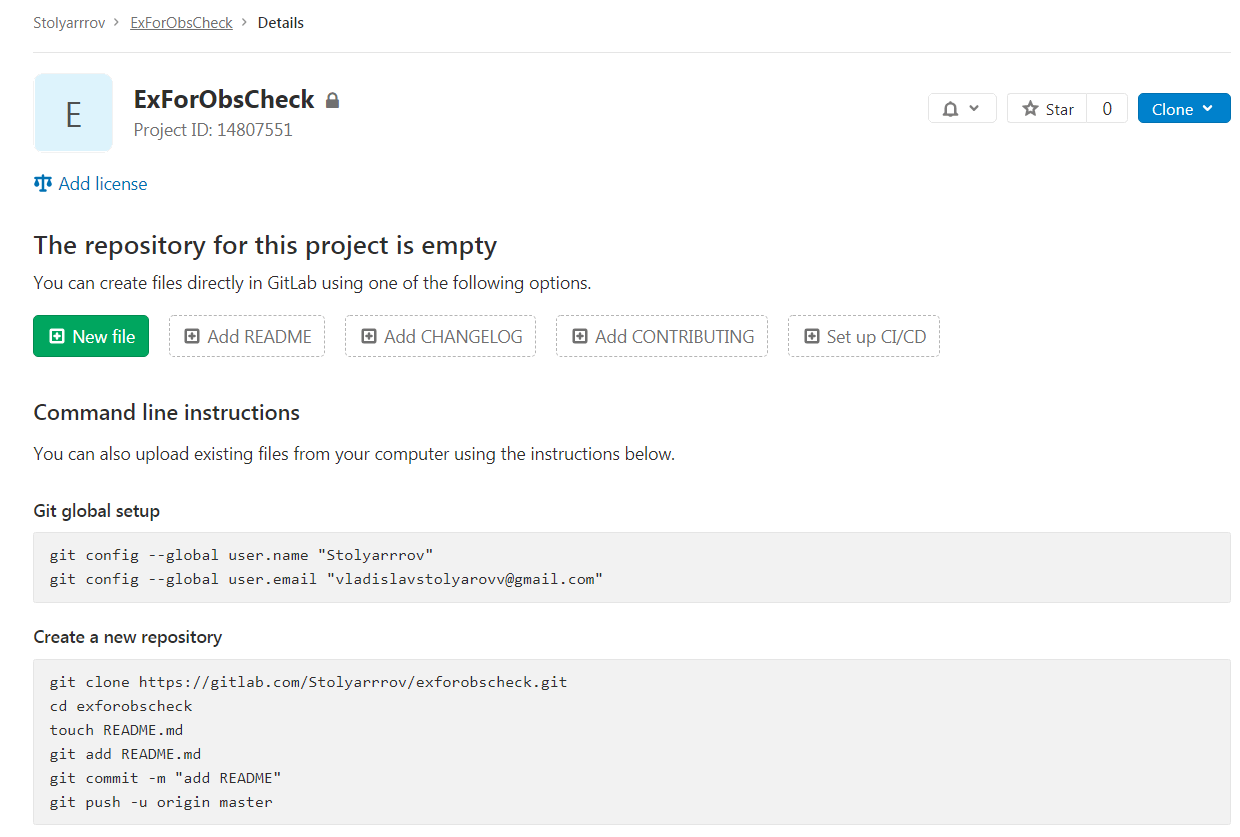
Next, we need to upload our project in the created repository. Do it using the hints that appear in the window of the created project.
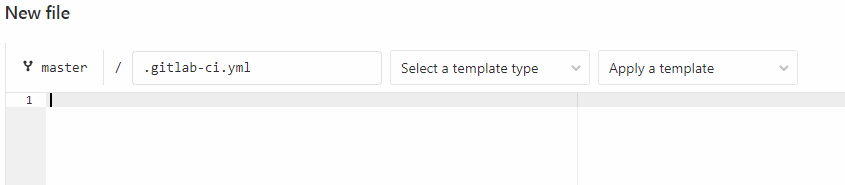
When you start the task, GitLab CI takes instructions from the .gitlab-ci.yml file. You can add it either by clicking Set up CI/CD, or simply by creating a local repository and uploading it to the site. Let's follow the first option:
Now make a minimal wrapper for the script:
image: debian
job:
  script:
Download the analyzer and sendemail utility, which we will need later:
- apt-get update && apt-get -y install wget gnupg
- wget -O - https://files.pvs-studio.com/etc/pubkey.txt | apt-key add -
- wget -O /etc/apt/sources.list.d/viva64.list
  https://files.pvs-studio.com/etc/viva64.list
- apt-get update && apt-get -y install pvs-studio
  sendemail
Next, we will install dependencies and utilities for building OBS:
- apt-get -y install build-essential cmake
  make pkg-config libx11-dev libgl1-mesa-dev
  libpulse-dev libxcomposite-dev
  libxinerama-dev libv4l-dev libudev-dev libfreetype6-dev
  libfontconfig-dev qtbase5-dev
  libqt5x11extras5-dev libx264-dev libxcb-xinerama0-dev
  libxcb-shm0-dev libjack-jackd2-dev libcurl4-openssl-dev
  libavcodec-dev libqt5svg5 libavfilter-dev
  libavdevice-dev libsdl2-dev ffmpeg
  qt5-default qtscript5-dev libssl-dev
  qttools5-dev qttools5-dev-tools qtmultimedia5-dev
  libqt5svg5-dev libqt5webkit5-dev  libasound2
  libxmu-dev libxi-dev freeglut3-dev libasound2-dev
  libjack-jackd2-dev libxrandr-dev libqt5xmlpatterns5-dev
  libqt5xmlpatterns5 coccinelle parallel
  libapparmor-dev libcap-dev libseccomp-dev
  python3-dev python3-setuptools docbook2x
  libgnutls28-dev libselinux1-dev linux-libc-dev
  libtool autotools-dev
  libio-socket-ssl-perl
  libnet-ssleay-perl ca-certificates
Now we need to create the file with the analyzer license (By default the file PVS-Studio.lic will be created in the directory ../.config/PVS-Studio). In doing so, you don't have to specify the license file in the analyzer running parameters, it will be caught up automatically):
- pvs-studio-analyzer credentials $PVS_NAME $PVS_KEY
Here PVS_NAME and PVS_KEY are the names of variables the values of which we specify in settings. They will store the PVS-Studio login and license key. To set their values, follow: Settings > CI/CD > Variables.

Build the project, using cmake:
- cmake -DCMAKE_EXPORT_COMPILE_COMMANDS=On /builds/Stolyarrrov/obscheck/
- make -j4
After that, run the analyzer:
- pvs-studio-analyzer analyze -o PVS-Studio.logPVS-Studio.log will store the analysis results. The resulting file with the report is not intended for reading. In order to make it accessible for a human eye, we need the plog-converter utility. This program converts the analyzer's log into different formats. For easy reading, let's convert the log into the html format:
- plog-converter -t html PVS-Studio.log -o PVS-Studio.htmlYou can export the report using artifacts, but we'll change tack and send the file with analyzer results by the email using the sendemail utility:
- sendemail -t $MAIL_TO
  -m "PVS-Studio report, commit:$CI_COMMIT_SHORT_SHA"
  -s $GMAIL_PORT
  -o tls=auto
  -f $MAIL_FROM
  -xu $MAIL_FROM
  -xp $MAIL_FROM_PASS
  -a PVS-Studio.log PVS-Studio.html
Full .gitlab-ci.yml:
image: debian
job:
  script:
    - apt-get update && apt-get -y install wget gnupg
    - wget -O - https://files.pvs-studio.com/etc/pubkey.txt | apt-key add -
    - wget -O /etc/apt/sources.list.d/viva64.list
      https://files.pvs-studio.com/etc/viva64.list
    - apt-get update && apt-get -y install pvs-studio
      sendemail
    - apt-get -y install build-essential cmake
      pkg-config libx11-dev libgl1-mesa-dev
      libpulse-dev libxcomposite-dev
      libxinerama-dev libv4l-dev libudev-dev libfreetype6-dev
      libfontconfig-dev qtbase5-dev
      libqt5x11extras5-dev libx264-dev libxcb-xinerama0-dev
      libxcb-shm0-dev libjack-jackd2-dev libcurl4-openssl-dev
      libavcodec-dev libqt5svg5 libavfilter-dev
      libavdevice-dev libsdl2-dev ffmpeg
      qt5-default qtscript5-dev libssl-dev
      qttools5-dev qttools5-dev-tools qtmultimedia5-dev
      libqt5svg5-dev libqt5webkit5-dev  libasound2
      libxmu-dev libxi-dev freeglut3-dev libasound2-dev
      libjack-jackd2-dev libxrandr-dev libqt5xmlpatterns5-dev
      libqt5xmlpatterns5 coccinelle parallel
      libapparmor-dev libcap-dev libseccomp-dev
      python3-dev python3-setuptools docbook2x
      libgnutls28-dev libselinux1-dev linux-libc-dev
      libtool autotools-dev
      make libio-socket-ssl-perl
      libnet-ssleay-perl ca-certificates
    - pvs-studio-analyzer credentials $PVS_NAME $PVS_KEY
    - cmake -DCMAKE_EXPORT_COMPILE_COMMANDS=On /builds/Stolyarrrov/obscheck/
    - make -j4
    - pvs-studio-analyzer analyze -o PVS-Studio.log
    - plog-converter -t html PVS-Studio.log -o PVS-Studio.html
    - sendemail -t $MAIL_TO
      -m "PVS-Studio report, commit:$CI_COMMIT_SHORT_SHA"
      -s $GMAIL_PORT
      -o tls=auto
      -f $MAIL_FROM
      -xu $MAIL_FROM
      -xp $MAIL_FROM_PASS
      -a PVS-Studio.log PVS-Studio.html
Click commit changes. If we did everything right, we will see the output: This GitLab CI configuration is valid. To track progress, let's move to the tab CI/CD > Pipelines.

Click running. We'll see the virtual machine terminal window where our configuration file runs. After a while we get a message: job succeeded.

So it's time to open the html file with warnings sent by mail.
Let's take a look at some warnings from the report, revealing errors in the Open Broadcaster Software project so as to get the essence of static code analysis. Since the main purpose of the article is to describe principles of PVS-Studio and GitLab CI/CD interaction, only several nontrivial examples have been picked over. We are ready to give the authors of the project a temporary license and, if they wish, they are welcome to perform a more thorough project analysis. In addition, they can use one of the ways to get a free PVS-Studio license.
Also everyone can get a trial key to explore the PVS-Studio capabilities and check their projects.
So, let's pay attention to some examples of found errors in Open Broadcaster Software.
Warning N1
V547 Expression 'back_size' is allways true. circlebuf.h (138)
struct circlebuf
{
  ....
  size_t capacity;
};
static inline void circlebuf_place(struct circlebuf *cb,
      size_t position,....,const void *data, size_t size)
{
  ....
  size_t data_end_pos;
  data_end_pos = position + size;
  if (data_end_pos > cb->capacity)
  {
    size_t back_size = data_end_pos - cb->capacity;
    if (back_size)
    {
      memcpy((uint8_t *)cb->data + position, data, loop_size);
    }
  ....
}
The line if (data_end_pos > cb->capacity) is definitely worth taking a close look at. If the condition is true, the back_size variable, defined in the line below, will always be greater than zero, as here we deal with subtraction of the notoriously smaller value from the greater one. In the end, the condition, which is two lines below, will always be true. The redundant condition is not that harmless when it's followed by the code, changing data.
Warnings N2, N3
V629 Consider inspecting the '1 << indent' expression. Bit shifting of the 32-bit value with a subsequent expansion to the 64-bit type. profiler.c (610)
static void profile_print_entry(uint64_t active, unsigned indent, ....)
{
  ....
  active &= (1 << indent) - 1;
  ....
}
Confused operations over 32-bit and 64-bit types look suspicious here. First, the programmer evaluates the mask, using 32-bit types (expression (1 << indent) - 1), after that it implicitly expands into the 64-bit type in the expression active &= ... . Most likely, when evaluating the mask, usage of 64-bit types was also required.
Correct code version:
active &= ((uint64_t)(1) << indent) - 1;Or:
active &= (1ull << indent) - 1;By the way, the copy-paste version of this block is below, the analyzer also issued the warning for it: V629 Consider inspecting the '1 << indent' expression. Bit shifting of the 32-bit value with a subsequent expansion to the 64-bit type. profiler.c (719)
Warning N4
V761 Four identical blocks of text were found. 'obs-audio-controls.c' (353)
static float get_true_peak(....)
{
  ....
  peak = _mm_max_ps(peak, abs_ps(intrp_samples));
  SHIFT_RIGHT_2PS(new_work, work);
  VECTOR_MATRIX_CROSS_PS(intrp_samples, work, m3, m1, p1, p3);

  peak = _mm_max_ps(peak, abs_ps(intrp_samples));
  SHIFT_RIGHT_2PS(new_work, work);
  VECTOR_MATRIX_CROSS_PS(intrp_samples, work, m3, m1, p1, p3);

  peak = _mm_max_ps(peak, abs_ps(intrp_samples));
  SHIFT_RIGHT_2PS(new_work, work);
  VECTOR_MATRIX_CROSS_PS(intrp_samples, work, m3, m1, p1, p3);

  peak = _mm_max_ps(peak, abs_ps(intrp_samples));
  SHIFT_RIGHT_2PS(new_work, work);
  VECTOR_MATRIX_CROSS_PS(intrp_samples, work, m3, m1, p1, p3);
  ....
}
Four identical blocks. Almost in every case such code indicates a copy-paste error. Most likely, these functions must have been called with different arguments. Even if not, this code looks strange. A good solution would be to write the block only once and wrap it in a loop:
for(size_t i = 0; i < 3; i++)
{
  peak = _mm_max_ps(peak, abs_ps(intrp_samples));
  SHIFT_RIGHT_2PS(new_work, work);
  VECTOR_MATRIX_CROSS_PS(intrp_samples, work, m3, m1, p1, p3);
}
Warning N5
V560 A part of conditional expression is always false: '!modifiers'. obs-hotkey.c (662)
typedef struct obs_key_combination obs_key_combination_t;
struct obs_key_combination
{
  uint32_t modifiers;
  obs_key_t key;
};
static inline void load_binding(....)
{
  obs_key_combination_t combo = {0};
  uint32_t *modifiers = &combo.modifiers;
  load_modifier(modifiers, data, "shift", INTERACT_SHIFT_KEY);
  load_modifier(modifiers, data, "control", INTERACT_CONTROL_KEY);
  load_modifier(modifiers, data, "alt", INTERACT_ALT_KEY);
  load_modifier(modifiers, data, "command", INTERACT_COMMAND_KEY);
  if (!modifiers && (combo.key == OBS_KEY_NONE ||
                     combo.key >= OBS_KEY_LAST_VALUE))
  {
    ....
  }
  ....
}
Definition of the load_modifier function:
static inline void load_modifier(uint32_t *modifiers,
                                 obs_data_t *data,
                                 const char *name,
                                 uint32_t flag)
{
  if (obs_data_get_bool(data, name))
    *modifiers |= flag;
}
As we can see, modifiers is a pointer, initialized by the address of the modifiers field of the combo structure. Since its value doesn't change until the check, it will remain non-null. Moreover, after the initialization before the check the pointer is used when calling the load_modifier function, where it gets dereferenced. Accordingly, the !modifiers check is pointless, as due to the && operator we'll always get false when evaluating the logical expression. I think the programmer wanted to check an integer value by the address that is stored in the modifiers pointer, but forgot to dereference this pointer.
So it seems to me that the check should be as follows:
if (!*modifiers && ....)Or like this:
if (!combo.modifiers && ....)Warning N6
V575 The potential null pointer is passed into 'strncpy' function. Inspect the first argument. Check lines: 2904, 2903. rtmp.c (2904)
static int PublisherAuth(....)
{
  ....
  ptr = malloc(r->Link.app.av_len + pubToken.av_len);
  strncpy(ptr, r->Link.app.av_val, r->Link.app.av_len);
  ....
}
Most often such code is unsafe, as it ignores that malloc can return a null pointer. If malloc returns NULL, undefined behavior will occur in this case, as the first argument of the strncpy function will have the NULL value.
For more information on why it's important to check the return value of the malloc function, check out the relevant article.
Warnings N7, N8, N9
Guess which cases contain incorrect calculations:
class OBSProjector : public OBSQTDisplay
{
  ....
  float sourceX, sourceY, ....;
  ....
}
....
void OBSProjector::OBSRenderMultiview(....)
{
  OBSProjector *window = (OBSProjector *)data;
  ....
  auto calcBaseSource = [&](size_t i)
  {
    switch (multiviewLayout)
    {
    case MultiviewLayout::HORIZONTAL_TOP_24_SCENES:
      window->sourceX = (i % 6) * window->scenesCX;
      window->sourceY =
      window->pvwprgCY + (i / 6) * window->scenesCY;
      break;
    case MultiviewLayout::VERTICAL_LEFT_8_SCENES:
      window->sourceX = window->pvwprgCX;
      window->sourceY = (i / 2) * window->scenesCY;
      if (i % 2 != 0)
      {
        window->sourceX += window->scenesCX;
      }
      break;
    case MultiviewLayout::VERTICAL_RIGHT_8_SCENES:
      window->sourceX = 0;
      window->sourceY = (i / 2) * window->scenesCY;
      if (i % 2 != 0)
      {
        window->sourceX = window->scenesCX;
      }
      break;
    case MultiviewLayout::HORIZONTAL_BOTTOM_8_SCENES:
      if (i < 4)
      {
        window->sourceX = (float(i) * window->scenesCX);
        window->sourceY = 0;
      } else
      {
        window->sourceX =
       (float(i - 4) * window->scenesCX);
       window->sourceY = window->scenesCY;
      }
      break;
    default:// MultiviewLayout::HORIZONTAL_TOP_8_SCENES:
      if (i < 4)
      {
        window->sourceX = (float(i) * window->scenesCX);
        window->sourceY = window->pvwprgCY;
      } else
      {
        window->sourceX =
        (float(i - 4) * window->scenesCX);
        window->sourceY =
        window->pvwprgCY + window->scenesCY;
      }
    }
  }
  ....
}
Analyzer warnings:
Here's the right answer: in the ones, where i isn't cast to float. The analyzer shows us fragments with integer division. Such code might work not in the way the programmer had hoped.
As we can see, the PVS-Studio analyzer integration in your project on GitLab is a quite simple process. To do this, you just have to write only one configuration file and place it in your cloud repository. Due to the fact that GitLab has its own integrated virtual machine, we don't even need to spend a lot of time configuring the CI system. Code checking will let you find problems right after the build. This helps to eliminate problems at the stage where their complexity and cost are small as yet.
0
0
0

0